Riding Technique...
The following information was sourced from a Brenter bike manual and will serve as a general guide to basic technique.


STOPPING
Turn the bike perpendicular to the slope, lean and put pressure on the slope side handlebar and dig the ski edges into the snow. At slow speeds, turn the bike uphill or plow with your foot-skis. The Ski-Bike, by design, has excellent edging and stopping
Turn the bike perpendicular to the slope, lean and put pressure on the slope side handlebar and dig the ski edges into the snow. At slow speeds, turn the bike uphill or plow with your foot-
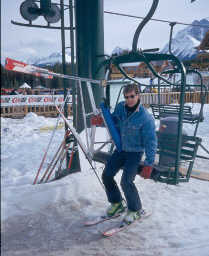
Note: The lift procedure will vary according to lift-chair design and bike style. Because of their seat and rear suspension design, Brenter's can usually be carried off to the side of the lift chair, with the seat wedged into the arm rest or support bar to hold the bike. Other designs require the bike to be held vertical between the legs with the bike weight resting on the rear of the seat (see photo on right). When initially loading using this method, be sure to angle the bike forward so the rear ski will have clearance under the chair and the front ski will clear any overhead mechanicals. Lifts can be filled to capacity using either of these methods. When riding alone in a triple+ lift, it is usually best to sit in the middle of the chair with the bike across your lap, or held vertically, in order to maintain lift balance. Of course, when there is sufficient room on the chair, any bike can be transported across your lap, or placed in the space next to you.
Tips and Tricks..
• Keep those foot-ski tips up!
• "Tail-braking", or edging the tails of your foot-skis into the snow, is a very effective method to "speed check" on narrow woods trails where there is not sufficient turning area. It allows for precise speed control.
• When in the lift line, place the bike between your legs and skate along. Then place it off to the appropriate side when approaching the lift.
• Keep those foot-
• "Tail-
• When in the lift line, place the bike between your legs and skate along. Then place it off to the appropriate side when approaching the lift.
• Basic Position • Side Slipping • Turning • Stopping • Chair Lift • Tips and Tricks •

Photo: Ian Watson
ADDITIONAL INSTRUCTION:
• A.S.I.A Handbook of Skibobbing
• S.A.G.B Instruction Manual
• Stalmach Academy
• A.S.I.A Handbook of Skibobbing
• S.A.G.B Instruction Manual
• Stalmach Academy